On my recent vacation, I took a bunch of bracketed exposures to turn into HDRs. Before this trip I only used a tripod for bracketing. This time around, however, I had to deal with hand-held bracketed shots. To make things a bit worse, these shots included foliage, which isn’t always stationary between shots. Picturenaut utterly failed to align these images. I tried Luminance HDR (qtpfsgui) for Windows 7 (64-bit), and it simply kept crashing. Then I tried Hugin, which too failed to do much. Besides, it was extremely confusing since it is a tool for stitching panoramas, with HDR and alignment being a part of the whole.
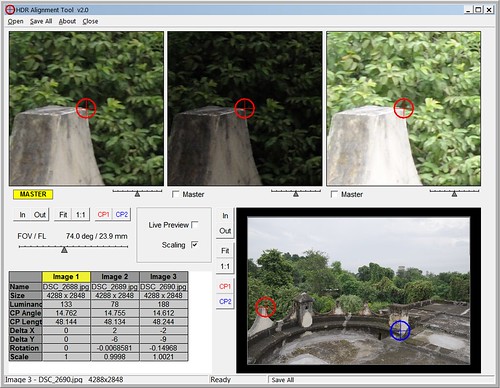
Finally, I found HDR Alignment Tool — a free Windows utility for aligning multiple images using manually selected control points. Following is a screenshot of what the tool looks like.
There’s a selection of input files at the top, and the output preview in the bottom right corner. The “In”, “Out”, “1:1” and “Fit” buttons are zoom settings for either the source images all together, or for the output preview. “CP1” and “CP2” refer to the control points and allow centering on the chosen control point.
The default selection of control point locations and the resulting alignment aren’t great, so just relocate each of them manually and fine-tune the alignment by visually inspecting the sharpness of the output image near the chosen control point. It’s cumbersome, but it works pretty well. The tool also includes some lens correction features but I didn’t use them, instead making Capture NX2 apply lens correction while creating the source JPEGs. Oh, let me now get to the workflow, which is a bit involved since HDR Alignment Tool doesn’t work with TIFF or RAW files.
- Load each bracketed exposure in Capture NX2.
- Ensure that all exposure parameters (white-balance, etc.) are the same, apply any other pre-processing steps (lens distortion correction, in my case) and create JPEGs.
- Open the JPEGs in HDR Alignment Tool, carry out the alignments and save the aligned JPEGs. By default, the tool will append “Aligned” as a suffix to the file name for distinction.
- Open the “*Aligned.JPG” files in Picturenaut. Apply the desired Tonemapping. Save the tonemapped output as a 16-bit TIFF.
- Load the TIFF back in Capture NX2, apply post-processing (tilt, sharpening, colour adjustments, etc.) and finally save the HDR JPEG.
The following photo is one example of the manually aligned HDR that I created. Creating one HDR took me about 20 minutes, after I got all things sorted out. The bottomline, however, is that its best to avoid these acrobatics and directly shoot with a tripod if you’re intending to create HDRs. You never know when you might want to create an HDR, so the second thing to remember is to always carry a tripod where possible… or get a Sony NEX-5 😉

